Showing posts with label delicious. Show all posts

Saturday, February 04, 2012

Healthy In Disguise

Can I just give a shout out to all the mommas who struggle, like me, to get her kids to eat veggies at meal time? Do you stress like I do, that they aren't getting the necessary nutrients in a natural form, to make a difference? Me too. Well, I love, LOVE when I find a recipe that is healthy, but no one raises a fuss at the dinner table.

I love many of Rachael Ray's recipes. She's cutesy in kind of an annoying "you have no kids and can travel the world freely so I hate you" kind of way. I can look past all that though, when I come across an amazing meal that isn't complicated and makes my kids sing. So, here is the recipe I just tried this evening and was pleasantly surprised to find, just enough left over, too good to pass to the dog, so I can have it for a midnight snack. Another testament to how good this was: I ate until I hurt. Which I don't think I've ever done. I know that's probably not healthy, but I figured, since it was a heaping helping of dark leafy green veggies, it was okay.

Chicken Tacos w/Kale and Salsa Verde
  • 2 tomatillos, husked and rinsed
  • 1 clove garlic unpeeled
  • 1 Serrano chile, stemmed, seeded, chopped coarsely
  • 5 sprigs cilantro, stems removed and leaves coarsely chopped
  • 1 Tbsp olive oil (EVOO is so dorky to say!)
  • salt/pepper to taste
Preheat oven to °350 F. Place the tomatillos on a rimmed baking sheet, sprinkle with a pinch of salt, and roast for 20 minutes. Cool. Cut into fourths.

In a small skillet, roast the garlic over medium heat, turning once until the skin is slightly blackened and the flesh is soft and fragrant. I didn't have garlic cloves, but a jar of chopped garlic. So I heated olive oil and on medium heat (watching closely as it can burn quickly), let it cook until it started to turn golden brown. I spooned out the garlic, draining slightly of the olive oil, but leaving the oil in the pan for later.

In a food processor, place the cooled tomatillos, garlic, chile, cilantro, and olive oil into a food processor with a pinch of salt, and pulse until a coarse textured salsa. Taste and add any additional salt and pepper if needed.
  • 1 Tbsp olive oil
  • 1/2 C. firmly packed green or black kale, chopped
  • 1/2 C. cooked chicken (I had turkey), shredded or cut into small cubes
  • 4 Corn tortillas (though we used around 6)
  • 1/4 C. red onion chopped
  • 1/4 C. crumbled queso fresco (a Mexican cheese)
  • Mexican crema or sour cream
In the skillet with left over garlic olive oil, add another tablespoon of olive oil, and heat over medium heat. Add the kale, season with salt and cook until wilted. Stir in the chicken and tomatillo salsa you just made. Cook until heated through. Lower the heat to keep warm and cover.

Preheat a griddle or large skillet. Cook the tortillas on both sides until soft and warm. We like to sprinkle with a little salt. The shortcut is to wrap the tortillas in a damp kitchen towel and microwave for 30 seconds.

To make, place a few heaping tablespoons of the chicken mixture onto each tortilla, sprinkle with queso fresco, onion and drizzle with Mexican crema or sour cream. Then, ENJOY!

You have to have the onion, it ties the flavors all together. So, if you aren't a fan of onion, try to just have a little onion. It really makes a world of difference. Also, white corn tortillas, we found, have the best flavor for this recipe. We noticed the difference between flour and white corn, since we ran out of the corn tortillas part way through.

Tuesday, October 18, 2011

Bacon

Bacon stands alone as one of the top great inventions in food. It can stand alone or be added into almost any food and that dish will be better for it. From the simple perfection of a BLT.... a moment to adore the lovely BLT...

... to the surprisingly wonderful Bacon Chocolate Bar, bacon DOES make everything better!
The wonderful guys at J&D's have made it their life's work to infuse our lives with bacon. I fell in love with their bacon salt and use it on just about everything.

So, of course with both mother and father loving bacon, would it be any wonder that our offspring would also have an almost unholy love for the smoky pork goodness of bacon? My son Connor... he is whip smart and funny. He loves... LOVES bacon. So, one morning, he was reveling in the flavor of dad's latest pick of bacon from the store and took us all with a phrase that we have now copyrighted:


"DANGER TASTES LIKE BACON!"

After a day of chuckling about it, my son asked if we could make a tshirt with that on it. So, I set to creating a design and what we came up with seemed pretty awesome. I put it up on my art gallery under it's own category. I'm hoping, even if it's just for my son, that the idea takes off. He is constantly asking if anyone has bought a shirt yet. Only two so far, but I hope that other like minded folks will notice and find it clever enough to buy a design. If you are such a warm soul, you can check out the products by clicking on any image below.

Danger Tastes Like Bacon shirt
Danger Tastes Like Bacon by cnlbell

Danger: Bacon Flavored shirt
Danger: Bacon Flavored by cnlbell

Danger Tastes Like Bacon hat
Danger Tastes Like Bacon by cnlbell

Breakfast Mug mug
Breakfast Mug by cnlbell

There are more designs. Kid's and women's tshirts and I even made a dog tshirt. So, check out the whole line and maybe you will find a great gift for someone you know, who loves bacon.

Wednesday, December 22, 2010

Cupcakes To Die For

Eggnog Pudding Pie Cupcake

Inspired to bake something time intensive and totally worth it, I took a cue from the Urban Outfitter's blog and tried their recipe for Eggnog Pudding Pie Cupcakes (click for original post). I didn't deviate from the recipe, but if I get adventurous again, I will post another recipe with the changes, and you know it won't be long before I am tinkering. FYI: click on each picture to bring up a bigger picture with more detail. So, without further ado, a true baking adventure!...


Eggnog Pudding Pie Cupcakes

Makes: 18-20 cupcakes that taste just like Christmas.

Eggnog Pudding Pies
1 4.6oz box of vanilla "cook and serve" pudding
3 cups eggnog
1 batch of whatever pre-made pie crust you'd like

1. Put the pudding mix and eggnog into a medium saucepan. Bring to a boil over medium heat, stirring regularly with a whisk (this process should take about 10-12 minutes). Once the pudding has boiled and thickened, pour into a mixing bowl, cover with plastic wrap, and set in the fridge. (To avoid “pudding skin” put the plastic wrap directly on the surface of the pudding.)
2. Next, make the pie shells. Pre-heat the oven to 425°F. Roll out your pie crust, and cut 20 small circles using a small juice glass or cookie cutter. They need to be large enough to cover the bottom and the sides of your mini cupcake tin. Press the circles of dough into lightly-greased mini cupcake tins and use a toothpick to poke a few holes into the bottom of the dough.
Didn't have a smaller tin, but it still worked fine.
 3. Bake for 10 minutes, until golden brown. Allow to cool while you make the cupcake batter! Turn the oven down to 350°F.

Cupcakes
1 1/2 sticks unsalted butter, room temperature
1 1/2 cup granulated sugar
3 eggs
2 tsp baking powder
1/2 tsp baking soda
2 tsp vanilla extract
1/4 tsp salt
2 1/2 cup flour
1 1/3 cup whole milk

4. Cream the butter and sugar together in a mixing bowl on medium-high speed until it’s fluffy and pale. Add the eggs, one at a time, stopping between each addition to scrape down the sides of the bowl. Beat for a minute or so, until the batter is smooth. Add the baking soda, baking powder, salt, and vanilla, and beat on medium-high speed for two minutes. 

5. Finally, add the milk and the flour, alternating between the two ingredients about a cup at a time, and beat until the batter is creamy and without lumps.

6. To assemble the eggnog pudding pies, simple spoon a heaping teaspoon of pudding into the cooled pie crusts. If you’d like (and you would!) top each pie with an extra sprinkle of nutmeg.
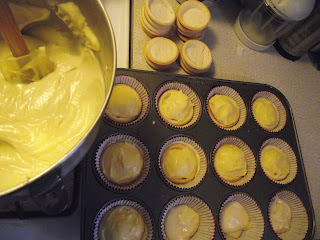
7. Spoon a heaping tablespoon of cupcake batter into paper-lined cupcake tins. Gently press one pie into each tin, and then cover with another heaping tablespoon of batter, so the top and the sides of the pie are completely hidden. The tins should be about ¾ of the way full (maybe a little more--that’s okay, too).  
8.Bake for about 24 minutes until the cake sets and starts to turn golden brown. Allow to cool completely before frosting.
Butter Cream Frosting
1 can cranberry jelly (I only had sauce)
2 sticks unsalted butter, room temperature
2 cups powdered sugar
1. To make the butter cream, whip the butter and 1 cup of powdered sugar together on high speed until fluffy. Slowly add the canned cranberry jelly, then mix for a minute or so on high speed again. Add another cup of powdered sugar and then give it a taste. Add more sugar if necessary. If the mixture is too thick, add a little whole milk to it to thin it out a bit. Side note: having sauce meant chunks of cranberry. I think this was fine as it left nice tart pieces that dot the frosting. I did find I needed a little more powdered sugar though.

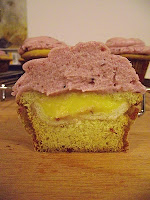
Inside: See the pie?
2. Frost the cupcakes! If you’d like, top with a drizzle of melted white chocolate and sprinkles. Some nutmeg would be delicious, too.

Saturday, October 16, 2010

A Chocolate Fix

Ever have one of those days? Where you just have to have something chocolate? It can't just be an average chocolate bar and it has to have a richness that forces you to slow down and savor every luscious bite. THAT is the kind of craving I had today. Nothing sounded good. Not ice cream or the various chocolate bars and bits at the grocery. Then, it hit me: Lava Cake! Nothing could possibly satisfy one's craving for pure rich milk chocolate, like Lava Cake. If done right, it is rich moist cake surrounding a pool of steaming chocolate. Choose a rich high quality chocolate bar for this recipe and you will have found the key to slowing time. You cannot devour this dessert with veracity. With the first bite, everything slows as every taste bud strains to hold onto the flavor. But I digress... Make this for someone you love, for chocolate laced kisses of gratitude later!

Chocolate Lava Cake


Moelleux au Chocolat: A French classic that literally melts in your mouth, and induces feelings of euphoria.

Ingredients:

  • 6 oz. Semi-Sweet Baking Chocolate (or use your favorite 70% dark chocolate bar)
  • 6 oz. Butter (diced, room temperature)
  • 3 Eggs
  • 1/2 C Granulated Sugar
  • 2 tsp vanilla extract
  • 1/3 C Flour
  • Butter for Ramekins
Directions:

Preheat oven to 350°F

Melt chocolate on low flame in a bain-marie (double boiler). When melted, take off flame, and stir in diced butter, until it melts.

In another bowl, beat eggs and sugar, until it starts to whiten. Stir in melted chocolate (making sure to stir quickly while drizzling chocolate in), vanilla and then the flour.

Butter 4 individual ramekins, and pour in chocolate batter. Cook for about 10 minutes, adding 5 minutes at a time until desired doneness is reached.

Cool until ramekins can be handled safely, but this is a dessert best served very warm! Tip ramekins upside down onto dessert plates and serve.

Tips:
  • You can  prepare your chocolate lave cake recipe ahead of time, and then bake 10 minutes before serving.
  • In terms of buttering the ramekins: butter the bottoms first, and then butter the sides, wiping from the bottom up to the top. It helps the chocolate to rise even more.
  • Regarding baking time… it depends on how runny you want it! I like it with the center runny like rich homemade cooked pudding.  For this, you want the top to be cooked through, but the center to be liquid. You can check with a toothpick after 10 minutes of baking. I've also pulled it out of the oven when the top is still shiny and just the edges looking cooked, then let it sit for 10 minutes (it continues to cook from the heat of the ramekin for a little while).

If you don't like liquid-center chocolate desserts, just cook for a little longer, and you will have an incredibly moist chocolate cake. Either way, it's a treat that is a perfect end to the day.

Tuesday, June 08, 2010

A Warm Memory: Pancit

When I was about six years old, my family lived in Kodiak. My parents had friends who were from the Philippines who were so generous! I remember being invited to their home for their family dinners (we were considered family) and seeing all the women in the kitchen cooking and laughing. Oh, the smells in that kitchen were divine! Adobo, lumpia and PANCIT! It was like magic in that kitchen! My mother was welcomed into the room and I saw her drawn into the group and taught the culinary sorcery of the Filipina cook. Then, I was off, to play with the many kids running about the place. Later, the meal was full of laughter and many helpings of everything.

My mom picked up the recipe and it never stayed the same. Sometimes the meat was shrimp or pork or even hot dogs when money was tight. The veggies were all over the place too. But the flavor was always amazing and takes me back. So, one day, while at the library, I spied a book that reminded me of that magic dish. "Cora Cooks Pancit" by Dorina K. Lazo Gilmore. It even had a recipe in the back! We took it home and I read the story with the boys to get them excited about the meal. I had hoped they would cook with me, but alas, the evening summer sun and a sprinkler called them outside, so I cooked alone. It was still wonderful, and the quiet of Lachlan in his wrap snuggled into me, I could remember the smells and laughter easier. Next time, they will help. So, without further adieu, here is.... Pancit!

  • 3 boneless chicken breasts plus 1/2 C. chicken broth and 1 tsp soy sauce
Chicken can be prepared ahead of time. Cook boneless chicken breast, chicken broth, and soy sauce in a crock pot or slow cooker on high for 3 hrs or on low for 6 hrs. Cool chicken and shred.
  • 1(8oz) pkg rice stick pancit noodles
  • 1(8oz) pkg dried shiitake mushrooms
Soak noodles in warm water for approx. 30 min. Soak mushrooms in a separate bowl of warm water for 30 min. Meanwhile, cut up vegetables...
  • 1 yellow onion, chopped
  • 2 Tbsp plus 1/4 C. soy sauce
  • 2 garlic cloves finely chopped
  • 1 Tbsp fresh ginger finely chopped
  • 1 Tbsp vegetable oil
Strain mushrooms and either leave whole, or do like I did, slice into thin strips (the better to trick little boys into eating them! Muhahahahaa!). Heat chicken, mushrooms, onion and soy sauce in a non-stick skillet. Stir in garlic and ginger. Sprinkle with salt and pepper to taste. Set aside.
  • 1 Tbsp oil
  • 1/2 head cabbage shredded
  • 2 carrots thinly sliced
  • 3 celery stalks sliced
  • 1(8oz) can water chestnuts sliced
  • 1(8oz) can bamboo shoots sliced
  • 1(8oz) can baby corn diced
Heat oil in large shallow pot. Add cabbage, carrots, celery, water chestnuts, bamboo shoots, and baby corn. Sprinkle with salt and pepper. Cook briefly, keeping the cabbage and carrots a little crisp. Add chicken/mushroom mixture.

Strain noodles. In a separate pot, bring 1 1/2 C. water, 1/4 C. oil, 1/4 C. soy sauce and a sprinkle of salt to a light boil. Add noodles and stir. Cook 5 min then pour noodles into the chicken and veggie mixture. Mix everything together and cook on low for 5 min.

Garnish, if you like, with sliced hard boiled eggs and green onions. Have fresh wedges of lime to splash on for a bit of brightness (must have this!). Serve!

Makes 10-12 (2 cup) servings

Past Musings You Might Ponder

Related Posts Plugin for WordPress, Blogger...